Add your e-mail account to an Android phone
1: From the home screen, choose APPS or swipe up to access your apps.

Here we have selected the Samsung E-mail app e-mail client.
If you don't have it you can get it for free by visiting: https://play.google.com
NOTE: You can chose any e-mail client that you prefer

* Click on Menu >
* Settings (icon) >
* ADD ACCOUNTS >
* then select: OTHER


INCOMING Mail Server Settings
You may chose from one of 2 methods:
* POP method downloads to your phone.
* IMAP method does NOT download and leaves the mail on the server.
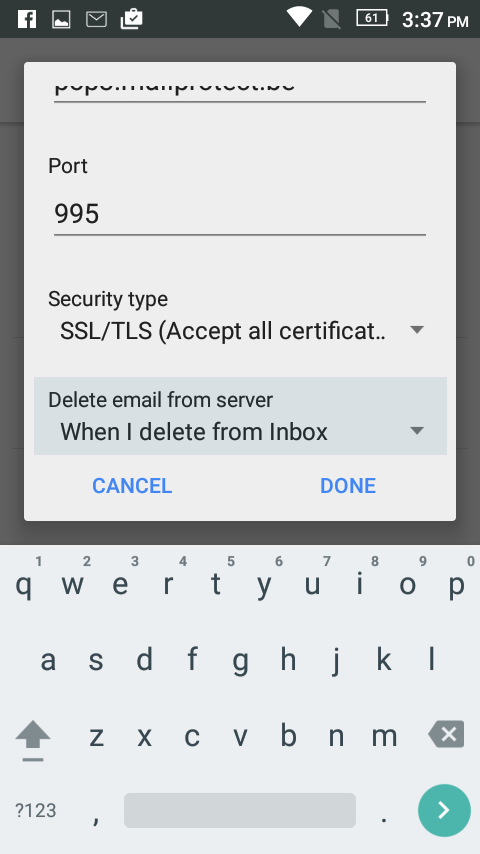
POP method settings:
Incoming Server: pop3.example.com (note: replace 'example.com' with your website's domain)
Security: SSL
Port: 995
Auto Delete From Server: When Deleted From Inbox (note: Delete Regularly to Prevent Reaching Disc Space Limit)
ACCEPT ALL CERTIFICATES (You may be asked this at the end of setup instead)
IMAP method settings:
Incoming Server: imap.example.com (note: replace 'example.com' with your website's domain)
Security: SSL
Port: 993
ACCEPT ALL CERTIFICATES (You may be asked this at the end of setup instead)
OUTGOING Mail Server Settings
Outgoing Server: smtp.youdomain.com
Security: SSL
Port: 465
Auto Delete From Server: When Deleted From Inbox (NOTE: Delete Regularly to Prevent Reaching Disc Space Limit)
ACCEPT ALL CERTIFICATES
OTHER SETTINGS: Email Sync Schedule: Every 15 minutes (or select option desired)
DONE - Save your settings
You can now check your e-mail send and receive.